Close

Intricate Insects
Lesson Plan, Grades K-6, Art, Science, Seasonal, Sharpie, Folia, Gelly Roll, Tru-Ray, Yes!, Sax
Description
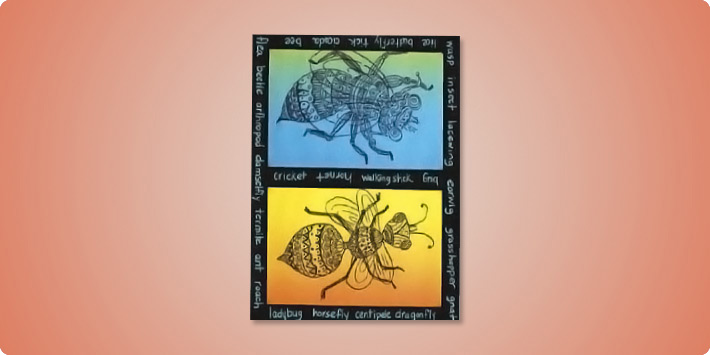
Children can, at the same time, be intrigued by bugs and horrified by them. As you study these ever-present (and important!) residents of our world, have your students create variations on real bugs. Draw them on Folia Transparent Paper with black Sharpies (or other markers) and elaborate on Mother Natures designs with myriad lines and small shapes. Frame them with black construction paper decorated with buggy words and hang these beastly beauties in a window to glow.
Objectives
- Students will learn the basic body parts of insects and include them in drawings of real or imaginary bugs.
- Students will explore a variety of lines and shapes to enhance their drawings.
- Students will brainstorm and learn a variety of words from the world of insects that will be come design elements in their art.
Supplies Needed
Folia Transparent Rainbow Paper, 25-Sheet Parchment, 13-1/2 x 20 246651
Sharpie Fine Point Permanent Markers, Black 077399
Gelly Roll Soufflé Pens, 10-Color Set 409071
Tru-Ray Construction Paper, Black, 50-Sheet Pkg., 12 x 18 054150
Yes! Paste Glue, 16-Oz. 401632
Sax 50 lb Manila Drawing Paper, 9 x 12 085541
Pencils
Scissors
Standards
CONTENT Standard #2: Using knowledge of structure and functions.
Grades K-4: Students describe how different expressive features and organizational principles cause different responses.
CONTENT Standard #3: Choosing and evaluating a range of subject matter, symbols and ideas.
Grades K-4: Students select and use subject matter, symbols and ideas to communicate meaning.
CONTENT Standard #6: Making connections between visual arts and other disciplines.
Grades K-4: Students identify connections between the visual arts and other disciplines in the curriculum.
Instructions
1
Examine the world of bugs. Look at pictures or actual samples of many varieties of bugs. Learn the body parts of insects.
2
Determine what size you would like the students to work. To easily frame a large drawing with the construction paper, keep the size of the drawing to 11 x 17 or smaller. The paper may be 12 x 18. For two smaller drawings framed side-by-side, the sizes should be no larger than 11 x 7-1/2, with the paper size being 12 x 8-1/2
3
Cut manila paper to the size you wish your final drawings to be.
4
Draw in pencil the outline of all of the main parts of the bug on the manila paper. Discuss various kinds of lines and small shapes that could be used to decorate the bugs. Add these details.
5
Cut the Folia paper to the correct size for the drawings. Cut to same sizes as the manila paper (Step 2).
6
When the preliminary drawing is satisfactory, lay a piece of the Folia Transparent paper over it and trace the outlines of the bug and then all the details using a black Sharpie.
7
When the tracing(s) are complete, cut openings in the Construction Paper that will frame the bugs. The construction paper may be 12 x 18 with a cutout of 11 x 17 or smaller for on large drawing. For two side-by-side drawings the construction paper may be 12 x 18. The two openings may be 11 x 7-1/2 or smaller.
8
As a class, brainstorm bug words: names of bugs, names of parts of bugs, descriptive words that convey the students feelings and thoughts about bugs. List all words on the board. How do these compare with the drawings they have made?
9
Each student should now write some of the words from the list around the frame for their drawing. Use light pencil first and then trace over the letters using the Soufflé pens.
10
Using Yes! Paste Glue, adhere the drawings to the back of the frames.