Close

Coloring Book of Mini Mandalas
Lesson Plan, Grades 9-12, Art, Math, Social Studies, Sax, Drawing
.jpg)
Description
Lesson Plan and Artwork by Carol Miller
A circular format, or mandala, is drawn of shapes and patterns with black pen outlines using a template or freehand. Colored pencil technique of blending is used to "color" designs.
Objectives
- Students will create an original coloring book of mini mandalas as a group project or individually.
Supplies Needed
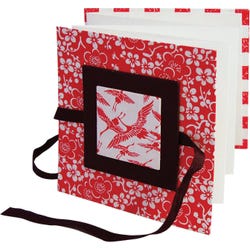
Reeves® Colored Pencils, 36 Colored Set Arnold Grummer's Zig Zag Book, 4 1/2" Square, Pack of 12
Sax® Artist Grade Colorless Blender, Pack of 2
Sharpie® Pen, Fine Tip, Black, Pack of 4
Alvin® Multi-Purpose Flexible Plastic Drawing Template, 1/16" 1/2"
UHU Glue Sticks, 1.41 oz.
Sax® Extra White Heavyweight Sulphite Drawing Paper, 9" x 12" , Pack of 500
*Here are the supplies needed for this lesson plan for reference. Find a convenient carousel of shoppable products for this lesson below.
Standards
Standard #1: Generate and conceptualize artistic ideas and work.
Standard #3: Refine and complete artistic work.
Standard #5: Develop and refine artistic work for presentation.
Instructions
1
The mini mandalas can be used as a small group project or individual. There are two covers and 10 pages including the back and front for each book in the group pack of Zig Zag books.
2
To make the mandalas, use a compass to draw a 3 1/2" circle from a sheet of copy paper and then cut out. Draw another 3 1/2" circle on the drawing paper, which will fit on the 4 1/4" book page.
3
Fold the copy paper circle in half. Open and fold in half again creating a criss-cross. Fold two more times making eight "slices of a pie".
4
Gently flatten the folds and place the circle on the drawing paper circle and make a mark at the ends of each fold, along the circumference.
5
Remove the copy paper circle. Using a ruler, lightly draw four lines from the circumference marks through the center of the circle so it looks like pie slices.
6
Using a pencil first, and starting in the center, lightly draw a circle or square placing the template over the center. Then draw another shape touching the first. This will be repeated in each quadrant. Continue until the circle is filled with line drawings to be colored.
7
Cover pencil lines with the black pen, then erase any pencil that still shows.
8
Color with the pencils, experimenting with blending colors. Try putting analogous colors next to each other and using pressure, overlap several times blending one color into another. This technique works with shades of the same color as well.
9
When the circle is filled, carefully cut out with scissors. If you would like to protect the mandala, coat with Tempera Varnish before cutting.
10
Assemble the Zig Zag book according to the directions in the group pack.
11
The pages are white. To cover them, if desired, cut two pieces of the Sax Art Paper, 13" x 4 1/4" for the front and 17" x 4 1/4" for the back
12
Use a UHU Glue Stick to cover the pages.
13
Glue 6"x6" Sax Art Paper to covers.
14
Glue the mandalas to the pages and covers.