Close

Indigo Resist Dye Sampler
Lesson Plan, Grades 6-12, Art, Science, History, Jacquard
Description
Indigo dye has a colorful pedigree. Originally, the dye itself came only from the Indigo plant harvested in warm climates. The dye is found on all continents but one. Civilizations have prized this precious plant for the rich blue color dyes it creates. The dyes earliest known use was in burial clothes found in Egyptian tombs.
It traveled the Silk Routes from China to Europe where it was considered the color of the Royals. Japanese peasants used it to make worn clothing look new. African tribes used their dyed clothes as trading barter. Indigo came to the U.S. with the slave trade and dyed Confederate uniforms and cowboy jeans. Along with an illustrious history Indigo dye has chemical properties that have taken years of testing to duplicate into a synthetic form. Indigo dye when mixed appears greenish in color once it comes in contact with oxygen it turns blue. There is nothing common about this dye.
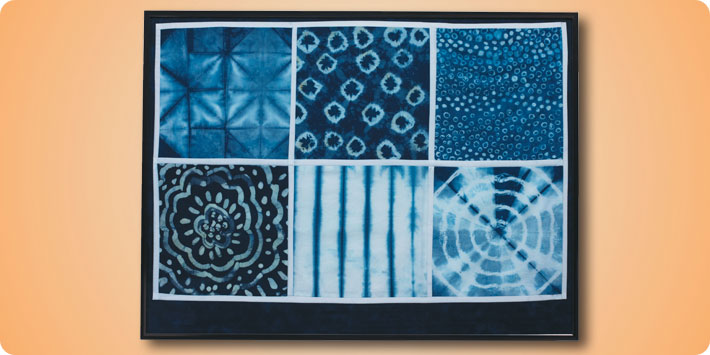
Indigo Resist Dye Sampler One of the earliest and most interested uses for Indigo is resist dying. Resist dying creates a pattern in fabric when a portion of the fabric is covered or bound so that the dye cannot penetrate. Bound patterns can be created by using string, thread and rubber bands. These materials can be bound around any objects such as wood strips, seeds or bottle caps. Covered patterns can be created by using wax or rice paste to penetrate that fabric so the dye cannot enter. Once the binding and covered materials are removed the un-dyed pattern is revealed.
Objectives
- The art of Indigo resist dying will be explored through the creation of a sampler. When finished the sampler can be framed or sewed into a wall hanging.
Supplies Needed
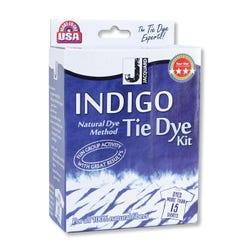
Jacquard Indigo Dye Kit 1411672
School Smart® Rubber Bands, Assorted Sizes, 1 lb. 002858
Adult Colored Latex Craft Gloves, Pack of 100 245886
Large Nitrile Gloves, Pack of 100 080511
Jacquard Yellow Beeswax, 1 lb. 1398013
Tjanting Needles, Set of 3 1430285
Dispenser Bottles and Tips, Set of 3 409693
Jacquard Silk Resist - Clear 401506
Bleached Muslin, 36" x 5 yds., 68/68 mesh 406382
Fiskars® Rotary Trimmer 1403179
C-Thru® Beveled Ruler, 2" x 18" 037526
Bamboo Watercolor Brushes S 443474
School Smart® Vinyl Art ApronAdult Size 085000
Other Materials
5 Gallon Bucket with Lid
1 Gallon Bucket
Assorted Brushes
Plastic Drop Cloth
Standards
CONTENT Standard #1: Understanding and applying media, techniques and processes.
CONTENT Standard #4: Understanding the visual arts in relation to history and culture.
CONTENT Standard #6: Making connections between visual arts and other disciplines.
Instructions
1
Have students research and study the history and science behind Indigo dye.
2
Share with students various resist dye techniques. These techniques can include but are not limited to: covered pattern techniques such as Batik wax, Japanese Tsutsugaki rice paper resists, bound resist such as African Adire stitching and Japanese Shibori tying methods. Students will uncover many different methods as they research Indigo Dye.
3
Students should keep a sketch book of ideas as they do their research for ease of reference. Select a natural fiber fabric such as cotton for this project. Muslin works well because it is not tightly woven and allows the dye to flow easily into the fibers. Do not use man made fabrics i.e. rayon and polyester. Wash and dry the fabric. Do not use fabric softener. Cut the fabric into 8 inch squares. This is the smallest size recommended.
4
Students should do four to six squares. This is a trial and error process. Each method of resist used should be recorded in their sketch book. Students should do at least two covered and two bound squares. They can select and record the methods used.
5
Once students have created their squares, a dye station should be constructed. Keep in mind that the dye bath will only last for seven days. Do not start the bath until everyone is ready to go. Select a dyeing area away from student traffic. We recommend you do this outside if possible as the process is messy and the dye can stain floors. Protect all surfaces with plastic. Have ready a five gallon pail with cover, a one gallon pail for water, rubber gloves and containers for the pieces after their time in the dye bath. I found that if each student has a mesh laundry bag or a plastic bag with small holes cut to hold their pieces none will get lost in the pail. I also recommend that a Dye Master be selected. One student doing the dyeing works best. All students should take part and determine how long they want their pieces in the bath. The longer time, the darker the color.
6
Follow the directions on the Jacquard Indigo Tie Dye package once the dyeing station is ready. This is a no fail method if the directions are followed. Discuss the directions for creating an Indigo Dye bath with students. Have them all experience the bloom and the unique green color of the dye bath.
7
Allow the pieces to dry. Rinse with soap and water. Remove whatever was used to create the resist. Allow to dry a second time and press with a hot iron to heat set.
8
Once resist squares are completed, they can be made into a sampler by sewing together like a quilt or by gluing to a piece of mat board for presentation. Spray adhesive works well for this method.
9
Have students explain the resist methods used for each of the squares in their sampler.