Close

Flowing Flowers
Lesson Plan, Grades 1-12, Art, Science, Prang, Adapted, Mixed Media
Description
Lesson Plan and Artwork by Sue Loesl
Nature provides beautiful analogous palettes of color, especially with flowers. Subtle shifting hues of colors next to each other on the color wheel encourage students to deepen their personal understanding of colors. Using watercolor crayons and bleeding tissue paper, students will explore the interplay of colors in a floral composition.
Objectives
- Understand the analogous color scheme utilizing watercolors.
- Create a background using watercolor crayons.
- Create flowers using tissue paper circles and watercolor crayons.
- Explore qualities of mixing watercolor media in a completed composition.
- Support independent art making opportunities utilizing adaptive art materials and tools.
Supplies Needed
Prang® Payons® Water Soluble Watercolor Crayon Set with Brush, Assorted Color, Set of 12
Prang® Large Triangular Colored Pencils, Assorted, Set of 12
Abilitations® Egg Ohs! Handwriting Grips, Set of 3
Creativity Street® Knob Handle Paint Brushes, Pack of 4
Royal & Langnickel® Big Kid's Choice™ Nylon Lil' Dippers™ Bristle Paint Brushes, Set of 3
Ucreate® Watercolor Paper, 9 x 12 Inches, 90 lb, White, 50 Sheets
TRU-RAY® Sulphite Construction Paper, 12 x 18 Inches, Assorted Standard Color, Pack of 50
Prang® Blue Glue Stick, .74ounce
Spectra® Deluxe Bleeding Art Tissue™ Circles, Assorted Size & Colors, Pack of 2250
Spectra® Deluxe Bleeding Art Tissue™ Squares, 1-1/2 x 1-1/2 Inches, Pack of 2500
Spectra® Bleeding Art Tissue™ Shapes Assortment, Assorted Sizes & Colors, 1.1 lb
*Here are the supplies needed for this lesson plan for reference. Find a convenient carousel of shoppable products for this lesson below.
Standards
Standard #1: Generate and conceptualize artistic ideas and work.
Standard #5: Develop and refine artistic work for presentation.
Standard #7: Perceive and analyze artistic work.
Standard #10: Synthesize and relate knowledge and personal experiences to make art.
Instructions
1
Present the analogous color scheme to students with a color wheel. First show a simplified color wheel and then a color wheel with the tertiary colors.
2
Give each student a piece of Ucreate Heavyweight 90lb watercolor paper and direct them to put their names on the paper with Prang Large Triangle Colored Pencils. The Abilitations Egg Ohs Handwriting Grip can be added to the pencil if the student needs a larger handgrip.
3
Hand out green and blue Prang Payons watercolor crayons for the background. Demonstrate for students how to use the crayons to draw thick straight lines of color from top to bottom, leaving some white paper between stripes of color. The stripes can be only blue or green, or both. This background represents sky and flower stems.
4
Using an adapted paint brush or the addition of an Abilitations Egg-Oh to a regular brush and a water cup with about an inch of water, direct students to smooth out the drawn watercolor crayon lines with water. Demonstrate for students to start at the top and pull the colors down to the bottom of the paper. Repeat with more water at the top of the watercolor paper until the entire paper is smoothly water colored. If more intense or more blended color is desired, students can dip the Prang Payons into water and draw more lines on their background, again smoothing out the color with water and paint brushing. Let dry.
5
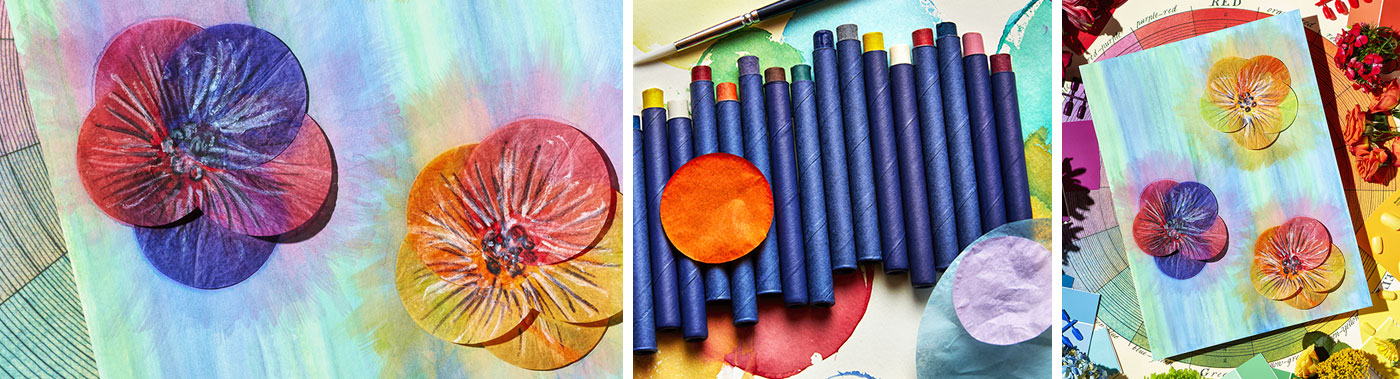
Prepare flat trays such as styrofoam trays with the Spectra Tissue Paper Shapes-Circles. Have students choose 5 tissue paper circles in analogous colors (3 colors) in numbers of 2 of each 2 colors and one of the last colors. Examples-2 Red/Orange-2 Orange and 1 Red or 2 Red, 2 Violet and 1 Red/Violet. These will be used to make the flowers for the composition. Students can choose to make 3 to 5 flower sets.
6
Have students choose where the flowers are going to be placed on the background. Using a Prang Disappearing Blue Glue Stick, students will glue their circles onto the background in a circular fashion, one on top of the previous one until there is a circle of circles joined in the middle. Start gluing one circle in place, add glue and overlap the next one, continuing until all are next to each other with the center covered. Continue this for all the flowers the student is adding to the design. NOTE: Only put glue onto the inside edge of the circle/petal, as the edges of the tissue will be pulled upward later in a 3D effect.
7
Take the paintbrush and dip into the water. Starting in the middle of the flower, put the brush with water into the center and “paint” with water from the center to past the edge of the petal onto the background. The bleeding color from the petal will flow onto the background past the petal and under the petal onto the background. Repeat the water painting with each petal until all petals are wet. The students should be directed to wipe their brushes of excess water on the edge of the water dish, as too much water can deteriorate the tissue paper.
8
Once the petals are all wet, students can take the other colors of Prang Payons and dip them into the water. Students can then draw circles and dots for texture in the middle of the flowers and draw lines on the petals. By dipping the Prang Payons into the water, they are soft enough to draw on the tissue with a light pressure. Continue for each of the flowers. If the students have a heavier pressure when they draw, let the tissue dry and then add the detail. For some students, minimize the number of flowers to 3 to reduce frustration with too many components.
9
When the flowers are completely dry, they will be pinched and folded to lift off the background, exposing a printerly affect from the bleeding tissue paper. Demonstrate lifting each from the surface gently starting at the middle and folding it in half as the fingers move to the outside of the petal. Do that for each petal so that they all stand up off the surface. Once all petals are lifted and folded, students can choose how open they would like the flowers to be, exposing the printed color on the background and the details on the petals.
10
Students can choose a color of 12x18 Tru-Ray Sulfite Construction Paper and glue their work on using a Prang Glue Stick to finish their composition.