Close

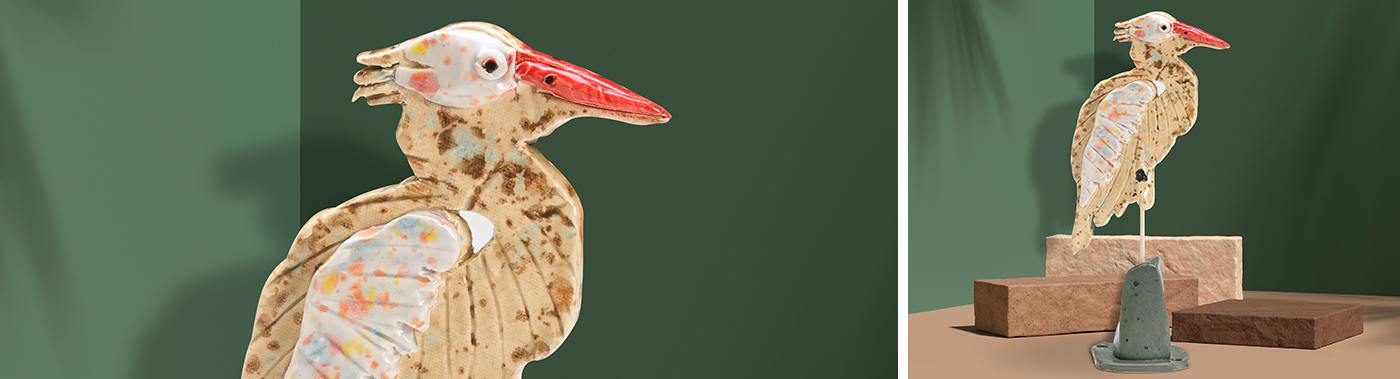
Yard Birds on a Stick
Lesson Plan, Grades 7-12, Art, Science, Ceramics & Sculptures, 3-D
Description
Lesson Plan and Artwork by Eric Orr
Birds are always around us – sometimes still or perching, often hungry or hunting. Graceful in flight and expressive in their actions, they bring a special visual and vocal presence to our yards, cities, and countryside. This lesson encourages the artist to freeze bird flight and details in flat clay slab reliefs, allowing the resulting sculpture to become a colorful part of the environment.
Objectives
- Observe and sketch various birds from nature or photographs. Draw them in flight or perching, hunting for food, being loud and rowdy, or quiet and safe from their predators. In your sketches, you will include body shape and details of head, feet and wings.
- Your major task will be to transfer the information from a linear sketch to slabs of clay, building up the bird in layers of clay that depict the essence of the bird in relief.
Supplies Needed
Texture Mat, 7 x 9 in, Retro Squares
Hosta Leaf Press Mold
Design Press Tool, Spiral Designs, Set of 4
Glaze Set, Pint, Set of 12
Fettling Knife, Soft Blade
Birch Dowels, 3/16 x 36 in, Pack of 10
Low Fire Earthenware White Art Clay, 50 lbs
Clay Slabmaking Complete Kit
*Here are the supplies needed for this lesson plan for reference. Find a convenient carousel of shoppable products for this lesson below.
Standards
Standard #1: Generate and conceptualize artistic ideas and work.
Standard #2: Organize and develop artistic ideas and work.
Standard #3: Define and complete artistic work.
Standard #4: Analyze, interpret, and select artistic work for presentation.
Standard #10: Synthesize and relate knowledge and personal experiences to make art.
Instructions
1
Transfer bird sketches to a piece of tag board. They can be realistic or fun and comical.
2
Cut out your tag-board bird as a template. You may need more than one template.
3
Using a roller and guide sticks, roll out a clay slab a bit larger than your template. It should be 1/4” to 3/8” thick.
4
Texture clay with rollers or stamps to suggest the bird’s feathers, structure, and details.
5
With a fettling knife or pin tool, cut out the clay shapes needed for your bird.
6
Assemble, overlap, cut away, model, and texture your clay to depict the bird.
7
Score and slip all shapes and parts to assemble your relief sculptured bird. The sculpture will be stronger as a whole than with lots of parts.
8
As your “yard bird” will be mounted on a vertical dowel rod, plan where the center of balance will be. Being sure there is plenty of clay in that area, gently push your 3/16” dowel rod up into the body, and make sure the rod will support your bird. As clay shrinks a bit when it dries and is bisque-fired, move the rod around a bit to gently enlarge the hole.
9
Finish the bird details and allow it to dry on a newspaper-covered board.
10
When dry, bisque-fire to cone 04, 1945°F.
11
Glaze the bird with two or three coats of fun and colorful glazes. Fire to cone 05, 1888°F.
12
Mount bird on dowel rod glued into body hole.
13
If you want to display your bird on a base, create a fired clay support or use a block of wood for a base heavy enough to hold up your bird. Shorten the rod.