Close

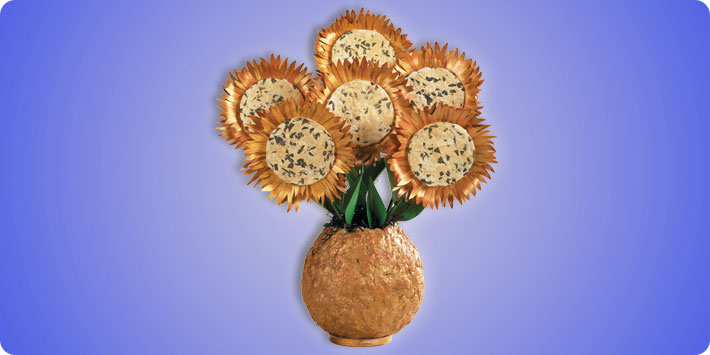
Seed-Paper Sunflowers
Lesson Plan, Grades 5-12, Art, History, Science, Sax
Description
Van Gogh's nineteenth-century paintings of sunflowers are among the world's most recognizable works of art. Inspired by these paintings, your students can transform two-dimensional art into three, creating their own lovely flower sculptures that bloom twice - once in a classroom vase, and again when their seed-paper blossoms are planted in the earth!
Objectives
- Students will alter the patterns and designs from Arnold Grummer's
- Seed Paper Flower Classroom Kit to fashion sunflowers.
- Students collectively will craft a vase to display their flowers in the classroom.
- Students will explore the history of Van Gogh's Sunflowers.
- Students will investigate handmade paper and its production.
- Students may delve into flower reproduction and seed germination.
Supplies Needed
Arnold Grummer's Seed Paper Flower Classroom Kit 411070
Arnold Grummer's Paper Casting Squares 408228
KolorFast® Non-Bleeding Tissue Assortment 214944
Sargent Art® Liquid Metal Acrylics, 8-oz. set 405594
Sargent Art® Liquid Metal Acrylics, 4-oz. set 409187
Sargent Art® Liquid Metal Watercolor, Gold 405780
Sax® True Flow Multi-Media Varnish 403960
Crayola® Model Magic, 2-lb. bucket 391130
Brushes
Scissors
Multi-Media Craft Glue
Card Stock
Balloons
Standards
CONTENT Standard #1: Understanding and applying media techniques and processes
CONTENT Standard #2: Using knowledge of structures and functions
CONTENT Standard #6: Making connections between visual art and other disciplines
Instructions
1
Follow the directions in Arnold Grummer's Seed Paper Flower Classroom Kit to produce handmade flower centers, replacing the provided tissue with small pieces of black Kolorfast Non-Bleeding Tissue. Dry.
2
Transform the precut flower shapes from the classroom kit into sunflowers:
3
Paint both sides of both flower shapes gold, copper or bronze with Sargent Art® Liquid Metal Acrylics. Dry.
4
With the other colors of metal acrylics, paint highlight and lowlight stripes on the flower petals. Dry.
5
Paint a stem and leaves from the classroom kit green with Sargent Art® Liquid Metal Acrylics. Fold leaves in half and add a bronze accent stripe down the center. Dry.
6
Curl the dry flower petals toward the flower center around a pencil.
7
Using Crayola® Model Magic, form the sunflower's receptacle - the back portion of the flower from which the petals emerge - in a short, flat, conical shape. Insert the stem in the receptacle's conical tip and bend it at a 90-degree angle. Remove it, put a drop of craft glue in the hole, and replace the stem, propping it in position until dry.
8
Paint the receptacle green with Sargent Art® Liquid Metal Acrylics. Dry.
9
Select a seeded flower center and gently paint the preferred side with Sargent Art® Liquid Metal Watercolor in gold. Dry. Tape leaves to the stem. Paint the tape with the same acrylic used on the stem. Dry.
10
Glue the seeded paper to the center of one of the flower shapes. Glue the second flower shape behind the first, orienting it to expose its petals. Glue the receptacle with stem to the back of the flower. Vase: Note: The vase takes several days to dry. Students may want to make it first.
11
Inflate a balloon to the size of the desired vase, being careful not to overinflate. Wedge the balloon knot down in the top of a cup half-filled with water to hold it in place. Set the cup and balloon in a bowl to catch drippings.
12
Use an electric or hand blender to mix Arnold Grummer's Paper Casting Squares with water as directed on the package. Pour undrained mixture into a large bowl.
13
Using fingers, place small portions of the paper pulp on to the balloon very gently, adding each portion immediately adjacent to the last. Gently manipulate the paper fibers to fill holes, keeping the fibers wet. When the balloon is covered, fill any remaining holes with pulp.
14
Dry for several days.
15
Remove balloon from cup. Cut a hole in the exposed portion of the balloon to deflate it. Gently peel the balloon from the interior of the vase. (Vase will be very fragile.)
16
Coat the interior of the vase with Sax® True Flow Multi-Media Varnish, handling it gently as the varnish will soften the vase. Dry.
17
Coat the exterior of the vase with Sax® True Flow Multi-Media Varnish. Dry.
18
Embellish the exterior of the vase as desired with Sargent Art® Liquid Metal Acrylics.