Close

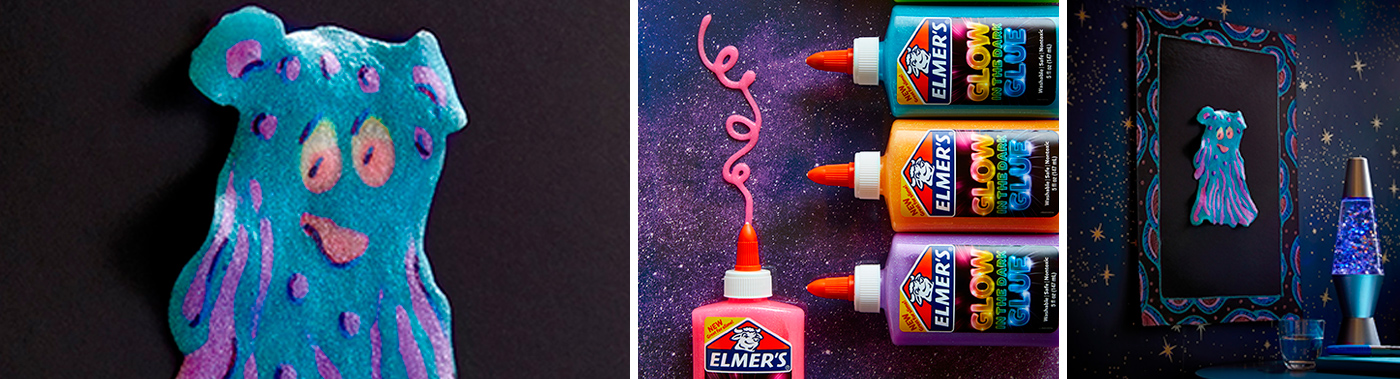
My Monster Above My Bed
Lesson Plan, Grades 3-7, Art, Math, Crafts, Mixed Media
Description
Lesson Plan and Artwork by Nadine Dresbach
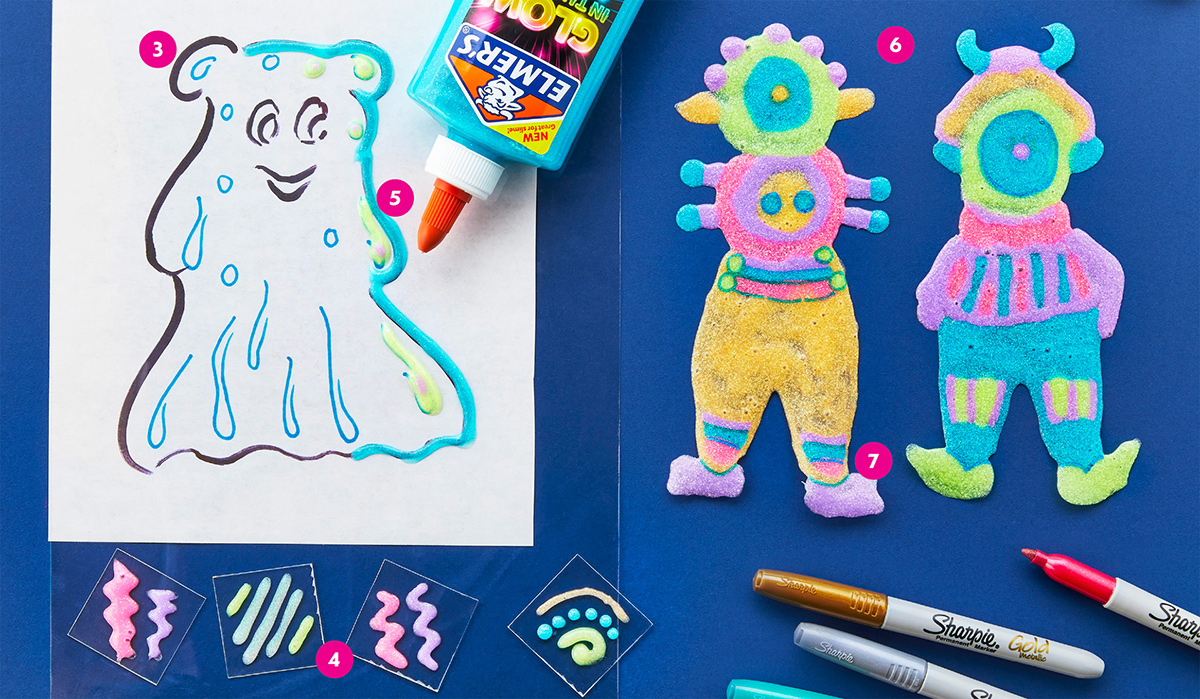
This lesson is designed to inspire the imagination. Using Elmer’s Glow-in-the-Dark Glue and decorative patterning, students will create a monster that can live above their bed instead of below it. Glue will be used as the primary medium to make the monster, which can then be peeled off and mounted. To accent the piece, the mounting board will be decorated with detailed patterns.
Objectives
- Create a creative monster design using inspiration and imagination.
- Students will demonstrate understanding of the various functions of mandalas in different cultures by discussing them in class.
- Write an accompanying short story about the monster.
Supplies Needed
Sax® Watercolor Paper, 90-Lb., 50-Sheet Pkg., 18" x 24"
Sax® Tracing Paper Pad, 50 Sheet Pad, 9" x 12"
Sax® True Color® Liquid Watercolors, 10-Color Set, 8-Oz.
Art Utility Cups, Pack of 125, 3.25 oz.
School Smart® Plastic Paint Palette, Pkg. of 12, 10-Well
Things You May Also Need:
Plastic containers for water
Sharpie® Metallic Permanent Markers, Fine, Assorted, Set of 36
Crescent® 8 Ultra Black™ Mounting Board 9 x 12 in, Pack of 40
Standards
Standard #1: Generate and conceptualize artistic ideas and work.
Standard #2: Organize and develop artistic ideas and work.
Standard #3: Refine and complete artistic work.
Standard #7: Perceive and analyze artistic work.
Standard #9: Apply criteria to evaluate artistic work.
Instructions
1
Cut enough sheets of the watercolor paper into quarters (9" x 12") so that each student has a piece.
2
Give each student a 9" x 12" tracing paper. Fold it in half the length of the paper and in half the width of the paper. There will be four equal sections, each 4.5" x 6". The point where the fold lines cross will be the center of the design. The same design will be repeated in each of the four quarters as described below.
3
Cut enough tracing paper sheets into quarters (4 .5" x 6") so that each student has a quarter sheet as well as the 9" x 12" sheet.
4
On the smaller piece of tracing paper, mark the bottom left corner with a red dot. This is your center point. Mark the bottom right corner with an "A". Mark the top left corner with a "B". See diagram #1.
5
Using organic or geometric shapes, draw a design that originates from and is connected to the bottom left corner.
6
Paperclip the design behind the top right corner of the large tracing paper and trace. Flip the design down, match up center points and "A"s and trace on the bottom right quadrant. Flip the design over to the left and match up center points and "B"s and trace in the bottom left quadrant of the large paper. Flip the design up, match center points and "A"s and trace in the top left quadrant.
7
Go over the lines on the large design with a dark colored Sharpie®. marker on one side of the tracing paper. See diagram #2
8
Cover the side of the tracing paper without the marker lines with a coating of pencil (graphite).
9
Place the tracing paper, graphite-side down, over the piece of watercolor paper and paperclip into the desired position. Using a colored pencil or ballpoint pen, trace over all of the Sharpie® lines. This will result in transferring the design as pencil lines on the watercolor paper.
10
Paint the design symmetrically, repeating the colors in the same way that the lines and shapes repeat. Be sure to clean your brush with water between colors.
11
Transfer the pattern lightly in pencil to the black mounting board and outline or fill it in using the appropriate medium.
12
Mount the monster in the center of the black mounting board. The monster’s glow-in-the-dark qualities will “shine” best if it is mounted slightly above the black mounting board. To do this effectively, stack very small pieces of scrap white mat or foam board to the desired height and glue them together. Determine their best placement areas under the monster and attach them with double-sided tape (Note: glue here is NOT recommended as it may reactivate the glue in the monster design). Lastly, measure and mark the monster’s placement and glue the white mounts (and the attached monster) to the black mounting board.
13
Take this opportunity to write a story about the monster: Where did it come from? What does it eat? Where does it sleep? What does it do during the day? This could be mounted below, under or on the back of the piece.