Close

Masters in Plaster
Lesson Plan, Grades 1-12, Art, Math, Pacon
Description
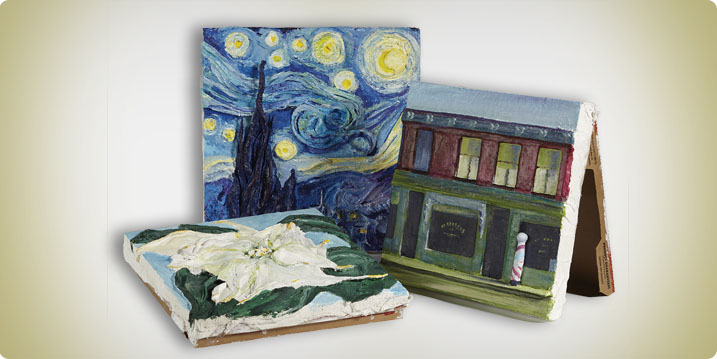
Give dimension and texture to an original 2D image using only a few materials. These pieces of artwork were created to emulate works of master artists and give them actual depth and texture using the plaster medium Plast'r Craft®. These pieces are also a bit unusual by using a pizza box for the canvas. This creates a finished self-standing piece but also is excellent during the execution of the work, as it serves as an easel. The art works used as resources for this lesson included: Edward Hopper - Early Sunday Morning, Vincent van Gogh - Starry Night and Georgia O'Keeffe - Jimson Weed.
Objectives
- Teachers and students will research the work of various artists to observe the use of the colors, depth and textures.
- Students will study the patterns, designs and textures found in the layering of the images in the piece and determine placement of those in the proper ratio.
- Students will learn and experience the process layering and modeling of plaster strips using the Plast'r Craft® medium.
- Students will study the artist's use of color and develop their skills of color mixing and blending.
Supplies Needed
Plast'r Craft® - 5 pounds 399395 or
Plast'r Craft® - 20 pounds 399398
Sax® True Flow® Acrylic Paint, Half Gallon Set of 6 439307
Sax® True Flow® Acrylic Gel Medium - Quart 442142
Additional Materials
Scissors
Tubs with water
Pizza box (corrugated), medium and large were used in the samples for this lesson
Paint brushes (large assortment including tiny ones to get into the folds of the plaster)
Standards
CONTENT Standard #1:Understanding and applying media, techniques and processes.
CONTENT Standard #2: Using knowledge of structures and functions.
Instructions
1
If the student is using the pizza box as a canvas, after selecting the artwork they will need to crop the original piece to allow for a square format if necessary. This will allow a proper ratio in transferring the image to the box. Always keep the image being used close at hand.
2
The Plast'r Craft® comes in large strips that will need to be cut to size.
3
Begin by making sure the pizza box is oriented so that the student is using the back of it as the canvas, and that the opening is at the bottom, and the hinge at the top.
4
If using a large or extra large box you will want to put something inside the box in the middle to give it extra support during the use of the Plast'r Craft® - it can then be removed once the Plast'r Craft® is dry. I used a square plastic food container with a lid that was the same height as the box and it worked very well.
5
Cut plaster strips a bit longer than the size of the box to allow for overlap of the edges. Cut just enough to create a base layer on the bottom of the pizza box canvas.
6
Dip the strips of Plast'r Craft® into water following manufactures instructions. Only dip them enough to get them wet and wring them out a bit. Do not allow them to soak in the water or you will dissolve all the plaster. Warm water will make the plaster harden quicker and cool water will allow for a bit more working time.
7
After the base coat is applied, layer the Plast'r Craft® on the canvas to create the texture and depth of the piece you are creating. Other elements can be used under the Plast'r Craft® where a deeper relief is desired. For example, on the Van Gogh I used tissue pieces crumpled up beneath the trees. On the Hopper I used rectangles of cardboard to create the façade of the building, before applying the Plast'r Craft® over them in flat sheets.
8
The piece does NOT need to be completed in one sitting or kept damp.
9
Once complete, set aside to dry. It will dry quickly to the touch but allow several days for it to dry thoroughly before painting it.
10
Again, follow manufactures instructions for painting suggestions. I used acrylic and it worked well, however I would recommend using a gel medium to extend the drying time. The plaster tends to absorb the first layer of acrylic so it dries very quickly. The gel will enable the students to have more time to blend their colors.
11
Once the piece is finished you can display it with its self-contained easel back, make a hole in the back of the box to hang it or it would be quite simple to attach a wood float frame to the piece.