Close

Mola Textile Art
Lesson Plan, Grades 5-6, Social Studies, Sax, Pacon
Description
Mola is the name for the decorative front and back panels of blouses in the traditional costumes of the Guna women, native to Panama. With their origins in body painting, the geometric designs of the molas were eventually adapted to reverse appliqué techniques utilizing multiple layers of fabrics and stitching. In this project, students utilize brightly colored papers and crayons to create their own mola design.
Objectives
- Students will investigate mola artwork created by the Panamanian Guna women.
- Students will discover how different cultures use animal symbolism.
- Students will explore elements of negative and positive space.
- Students will experience culture through the vibrant opaque tropical colors and free flowing patterns of animals and daily life of the Guna Mola art.
Supplies Needed
Tru-Ray Construction Paper Bright Assorted 9" x 12"
Tru-Ray Construction Paper Smart Stack 9" x 12"
Crayola Construction Paper Crayons Set of 16
Standards
CONTENT Standard #1:
Understanding and applying media, techniques and processes.
CONTENT Standard #3:
Choosing and evaluating a range of subject matter, symbols and ideas.
CONTENT Standard #4:
Understanding the visual arts in relation to history and culture.
Instructions
1
Research - Molas are brightly-colored, intricately designed panels worn by the Guna women. Students can use books or information from the internet to reference original Mola artwork and how animals are symbolized in this artwork.
2
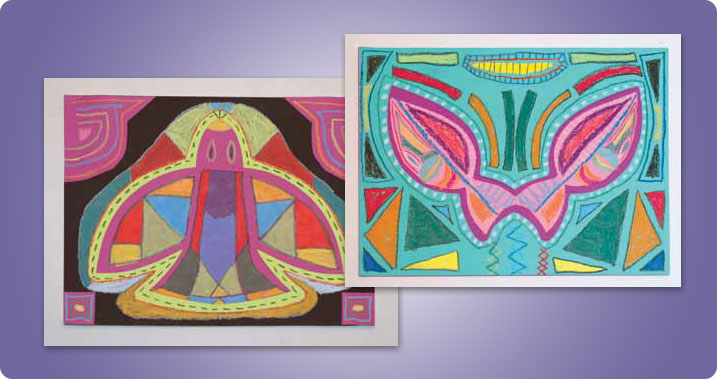
Construct the Artwork - Start with three 9" x 12" sheets of contrasting colors of Tru-Ray Construction Paper. Next, take two of the colors and fold them in half. On one of these sheets draw a large animal shape, staying at least 1/2" from open edges. If you want the finished project to have two symmetrical animals, draw the entire animal on the half sheet, overlapping part of the animal on the fold (Example A, Fish Mola). If you want only one animal shape, then draw half of the animal on the half sheet starting from the fold (Example B, Bird Mola). Cut the animal out. This is your positive shape. Take the positive shape, still folded, lay it on top of the second sheet of folded paper, making sure to line up the folds and draw a line 1/4" away from the positive shape (Example C). Cut this positive shape out and set aside. Take the remaining paper and unfold it revealing the negative shape.
3
Assembling Artwork - Gather the positive shape, negative shape and remaining full sheet of 9" x 12" construction paper (Example D). Glue negative sheet onto full sheet of construction paper. Unfold positive shape and glue inside of negative sheet (Example E).
4
Finishing Artwork - Fill in around animal by cutting shapes out of any remaining Tru-Ray Construction Paper. Add details with crayons.