Close

Embellished Bowls
Lesson Plan, Grades 3-12, Art, Social Studies, 3-D, Multi-Cultural
Description
Lesson Plan and Artwork by Nadine Dresbach
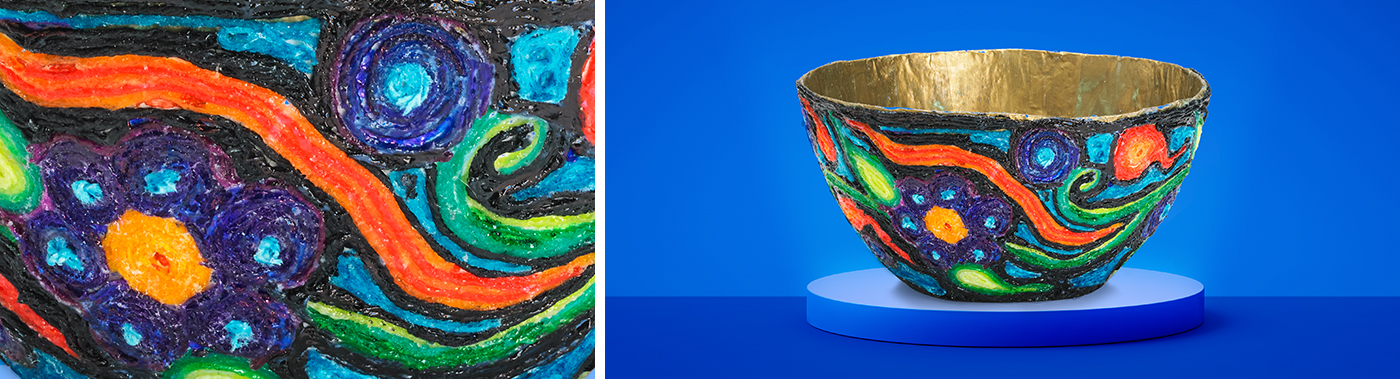
This lesson incorporates several artistic process methods that culminate in a striking finished project. The bowl itself is created using Plast’r Craft and its interior is then embellished with a faux gold leaf technique. Lastly, the exterior of the bowl is decorated using yarn, similar to the Mexican art technique of Huichol. However, the overall imagery is reminiscent of other cultures as well. This is a fun project that enables students to explore and emulate different styles.
Objectives
- Students will explore artwork of other cultures.
- Students will gain skills in various techniques of material application using the gold foil papers, plaster and yarns.
- Students will create their own designs to embellish the exterior of the bowls.
Supplies Needed
Trait-tex® Dispenser Box, Double Weight, Bright/Intermediate Colors, 16 - 4 oz Cones
Pacon Fadeless Acid-Free Metallic Paper, 50 lb, 12 X 18 in, Assorted Color, Pack of 24
Sax® True Flow® Multi-Media Varnish, Gloss, Quart
Mod Podge Fast Dry Tissue Glue and Glaze, 1 Pint Jar, Gloss
*Here are the supplies needed for this lesson plan for reference. Find a convenient carousel of shoppable products for this lesson below.
Standards
Standard #1: Generate and conceptualize artistic ideas and work.
Standard #5: Develop and refine artistic work for presentation.
Standard #11: Relate artistic ideas and works with societal, cultural and historical context to deepen understanding.
Instructions
1
Research various styles of art. The gold interior resembles Renaissance gold leaf techniques. For the exterior of the bowl, the Mexican yarn art form Huichol and/or Chinese cloisonné designs will be a wonderful inspiration.
2
To create the bowl: select a plastic bowl that is smooth without any ridges on the back. Cover the back of the bowl and a little bit over the lip of the interior with plastic wrap. Prepare Plast’r Craft as directed by the manufacturer’s instructions and apply 2 to 3 even layers of plaster wrap onto the exterior of the bowl. Cover the surface completely all the way to the edge; try not to let the plaster wrap turn in to the inside of the bowl - keep it flush with the top lip.
3
Allow to dry for 1-2 days.
4
When dry, gently work with your fingers around the edges of the plaster on the lip of the bowl to loosen the edge. Slowly and carefully apply pressure on other areas of the bowl, lifting the edges of plaster away from the plastic bowl. The plaster bowl will slide off the bottom of the plastic bowl.
5
Decorate the inside of the bowl. Cut the metallic foil paper into squares and rectangles 1 to 2 inches or even 3 inches in size, depending on the size of your bowl. Smaller squares will lay nicer, but may be more time consuming to apply. Starting at the top edge of the bowl, working in small sections, apply a coat of Mod Podge and lay the foil paper square onto it. Then brush a thin layer of Mod Podge gently on top of the foil paper as well. Continue around the edges of the bowl at the top, working your way down towards the bottom.
6
Allow to dry overnight.
7
Conceive your exterior bowl design on paper and lightly transfer that design to the exterior of your bowl, using a pencil. Keep in mind that the smaller the sections in your design, the harder it will be to apply the yarn to those areas. It is best to keep the designs relatively simple. This is a good time to plan out the colors and select which yarns you will use for which areas.
8
To decorate the exterior of the bowl, there are two optional methods. You can lay Mod Podge onto the plaster surface and coil Trait Tex yarn into the design pattern on top of the Mod Podge, or you can dip the Trait Tex yarn into the Mod Podge and coil it on top of the plaster bowl. Dipping the yarn will give you a harder, glossy finish when the bowl is completed. The Mod Podge also intensifies the colors of the Trait Tex yarn to make them a little richer when they are dipped.
9
If using the dip Trait Tex yarn method, when the bowl is completely dry you may note that if the Mod Podge was too thick in areas or completed areas got drips on them with additional Mod Podge, those areas will stay a little cloudy white. To touch this up, a pack of colored markers comes in handy!