Close

Botanical Color Wheel
Lesson Plan, Grades 6-12, Art, Art History, Math, Science, Prang, 3-D, Painting

Description
Lesson Plan and Artwork by Annette Johnson
Isaac Newton’s experiments with prisms in the mid 1600s led to the discovery of visible colors: red, orange, yellow, green, blue, indigo, and violet. Newton used these colors as the foundation to develop a theory of color based on a color wheel. In the 1800s Louis Prang invented the Artist’s Color Wheel which was made up of three sets of colors, primary, secondary, and tertiary. In this lesson, students will learn to mix colors using Prang Watercolors and create a color wheel based on the twelve colors of the artist’s color wheel. Students will create paper flowers, paint them with Prang Watercolors, and assemble them into a botanical color wheel wreath.
Objectives
- Study and learn to mix primary, secondary, and tertiary colors of a color wheel. Become familiar with common flower and petal shapes to construct their own paper flowers.
- Paint paper flowers with Prang Watercolors to match and represent the 12 colors found in the color wheel.
- Construct a botanical wreath using paper flowers they create using a styrofoam ring.
Supplies Needed
Prang® Semi-Moist Watercolor Paint, Plastic Oval Pan, 16 Assorted Colors
Strathmore® 400 Series Watercolor Pad, 9 x 12”, 140 lb, 12 Sheets
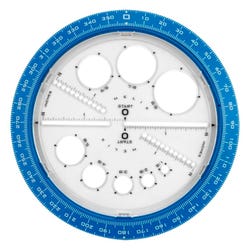
Helix® Angle and Circle Maker Protractor/Compass
School Smart® Handle-Like Head T-Pin, 1½”, Steel, Pack of 100
School Smart® Newsboard, 9 x 12”, Natural, Pack of 24
School Smart® Foam Boards, 11 x 14”, White, Pack of 25
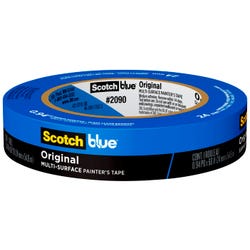
ScotchBlue™ Original Painter’s Tape, Multi-Use, 0.94” x 60 Yd
Sax® Spectrum Watercolor Brushes, Round, Short Handle, Assorted Size, Set of 5
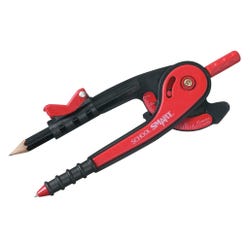
School Smart® Plastic Compass with Pencil, Rounded Safety Tip, Black/Red
E6000® Flexible Multi-Purpose Adhesive Waterproof Glue, 3.7 Oz.
*Here are the supplies needed for this lesson plan for reference. Find a convenient carousel of shoppable products for this lesson below.
Standards
Standard #1: Generate and conceptualize artistic ideas and work.
Standard #2: Organize and develop artistic ideas and work.
Standard #3: Refine and complete artistic work.
Standard #6: Convey meaning through the presentation of artistic work.
Instructions
Flowers: Create a Color Wheel
1
Cut an 8” square from a sheet of drawing paper. To identify the center, measure 4” from the left side of the paper and draw a line connecting the top and bottom of the paper. Make a 1/4 turn and repeat.
2
Line the Helix Angle and Circle Maker on the vertical line with the 0-degree mark on the top and the 180-degree at the bottom. Next, line up the 90-degree mark on the right side of the horizontal line with the 270-degree line on the left side. All four points need to be touching exactly. Hold firmly in place and draw a complete circle. Maintain contact, making marks every 30 degrees around the circle maker. You will have 12 evenly divided sections.
3
Connect each 30-degree mark with the one directly across the circle from it. Starting at the outside edge stopping at the 3/4” circle, begin drawing again on the other side of the 3/4” circle to the outside edge. Make sure that you cross the middle point where horizontal and vertical meet, so the lines match exactly.
4
Cut a 1” circle from each of the 12 colors. Glue them outside the largest circle, centering them between the 30-degree lines. This color wheel will be used to create your botanical wreath.
Flowers: Create a Template
5
Cut a second 8” square from a sheet of drawing paper. To identify the center, measure 4” from the left side of the paper and draw a line connecting the top and bottom of the paper. Make a 1/4 turn and repeat.
6
Use the center point of the paper, and with the aid of a compass draw 5 concentric circles. 3/4", 1", 2", 3", & 4".
7
Line the Helix Angle and Circle Maker on the vertical line with the 0-degree mark on the top and the 180-degree at the bottom. Next, line up the 90-degree mark on the right side of the horizontal line with the 270-degree line on the left side. All four points need to be touching exactly. Line the Helix Angle and Circle Maker on the vertical line with the 0-degree mark on the top and the 180-degree at the bottom. Line up the 270-degree mark on the left side of the horizontal line with the 90-degree line on the right side. All four points need to be touching exactly. Hold firmly in place and draw a circle completely around the circle maker. Continue holding it in place, marking off 30-degree sections completely around the circle maker. You will have 12 evenly divided sections.
8
Connect each 30-degree mark with the one directly across the circle from it, starting at the outside edge and stopping at the 3/4” circle line. This 3/4” circle line will be the flower center for the 2” flower. The 1” circle will be the center for your 3” & 4” flowers. Begin drawing again on the other side of the 3/4” circle to the outside edge. Make sure that you cross the middle point where horizontal and vertical meet, so the lines match exactly. Draw your petal shape in each 30-degree section. You will need to create three flowers each with a different petal shape.
Flowers: Create Botanical Wreath
9
Cut a piece of tracing paper 2-1/2” square. Center tracing paper on top of The Construction Guide and tape down with painter’s tape. Draw around the 3/4” circle, including one 30-degree wedge.
10
Remove tape and fold tracing paper in half so the circle and wedge are aligned along their outer edges. Draw half of the flower petal between the 3/4” circle and the top of the 2” circle. Turn the petal over and draw the other half of the petal on the other side of the tracing paper. Draw a line around the petal, moving it to the next division line until you have completed drawing all 12 petals. Cut out. Complete all 3 sizes, each with a differently shaped petal. Make separate flower shapes for the 3” & 4” flowers. Open the tracing paper petal template and glue it to the chipboard. Let dry and cut out template.
11
Place template on watercolor paper, then trace and cut out the flower. Paint both sides of the flower with Prang Watercolor Paints. They may require several layers of color. Continue making flowers until you have 12 of each size, shape, and color for a total of 36 flowers.
12
Cut 3/4” circles out of each color, and use them as centers for 2” flowers. Cut twice as many 1” circles to use as centers for 3” & 4” flowers. Cut a 1/4” foam board square, attach it to the bottom of each center, and glue in place. Each center should be placed on the flower that is it’s complementary color. Refer to color wheel for placement.
13
Position the Color Wheel inside the foam ring. Move it left or right and up or down so you can see the colors on the wheel, then position flowers according to the colors on the wheel. Use T-pins to hold them in place. Place 2” flowers on the inside of the ring. Alternate the 3” & 4” flowers on the top and outside of the foam ring. Once happy with the layout, start with one color and glue them to the foam ring. Hold in place with a T-pin until dry and then remove the pin if desired.