Close

Historic Lesson of Art & Science
Lesson Plan, Grades 8-12, Art, Science, Art History, Language Arts, Drawing
Description
Lesson Plan and Artwork by Doug Welles
John James Audubon was an ornithologist and painter whose illustrations of birds remain iconic even today. His work teaches us important lessons of observation, color, light, and artistic technique to depict on paper, feathers, bark, water, and foliage all within a natural setting. Through image research and use of watercolor pencils, students will learn the process of collecting and combining references, layout considerations, and the technique of rendering a bird in its natural environment. This lesson can extend further into scientific content through research on migratory patterns, Darwin’s finches and diversity, as well as art history.
Objectives
- Art History of John James Audubon and the importance of his work as a scientist and artist.
- Reference collecting, observation and interpretation.
- Science facts on migratory patterns, theories behind colored feathers, beaks, diversity, and environment.
- Material use and techniques of color layering and shading to create dimension and depth.
Supplies Needed
Watercolor Pencils, set of 36
300 Series Bristol Pad, 9x12, 20 sheets
Drawing Pencil, 2H, pack of 12
Drawing Pencil, 6H, pack of 12
White Paper Artist Tape, 1 in x 60 yds
Extra Soft White Magic Eraser, pack of 20
Oval Wash Brush, 1 inch, pack of 3
Colored Pencil Non-Stick Sharpener
Reference photos or images of birds and environments
*Here are the supplies needed for this lesson plan for reference. Find a convenient carousel of shoppable products for this lesson below.
Standards
Standard #1: Generate and conceptualize artistic ideas and work.
Standard #2: Organize and develop artistic ideas and work.
Standard #3: Define and complete artistic work.
Standard #5: Develop and refine artistic work for presentation.
Standard #7: Perceive and analyze artistic work.
Standard #9: Apply criteria to evaluate artistic work.
Standard #11: Relate artistic ideas and works with societal, cultural and historical context to deepen understanding.
Instructions
Lesson 1 - Diversity and Adaptation
1
Have students conduct research on John James Audubon and the importance of his work. What makes his work timeless and unique? What type of references did Audubon use? What material was used to create his illustrations?
2
Have students select one of Audubon’s bird illustrations and conduct research on the species including migration patterns, shape of beak and diet, type of feet, legs, and other features and how these are used to survive in their environment.
3
Without tracing, on a regular piece of 8” x 12’ drawing paper, have students create a 5” x 5” box with a #6 pencil. Within this box draw the bird they chose for this project.
4
Around the outside of the box, have students draw a specific feature of the bird, such as the beak, legs, wing or feet. Document in writing next to the feature facts describing the uniqueness and purpose of the feature to the survival of the species.
5
Student should provide a short oral presentation of their final work including a short essay on John James Audubon.
Lesson 2 - Observation and Rendering Technique Using Watercolor Pencils
1
Have students search and select bird photographs from various magazines, books or the internet, along with images of the environments these species live in. (Extended activity involves students actually photographing real birds in their natural setting).
2
Next, students should use their references to create several thumbnail sketches using different angles and layouts combining environmental elements with the main image of the bird. After reviewing with instructor, students should select one sketch for the final project.
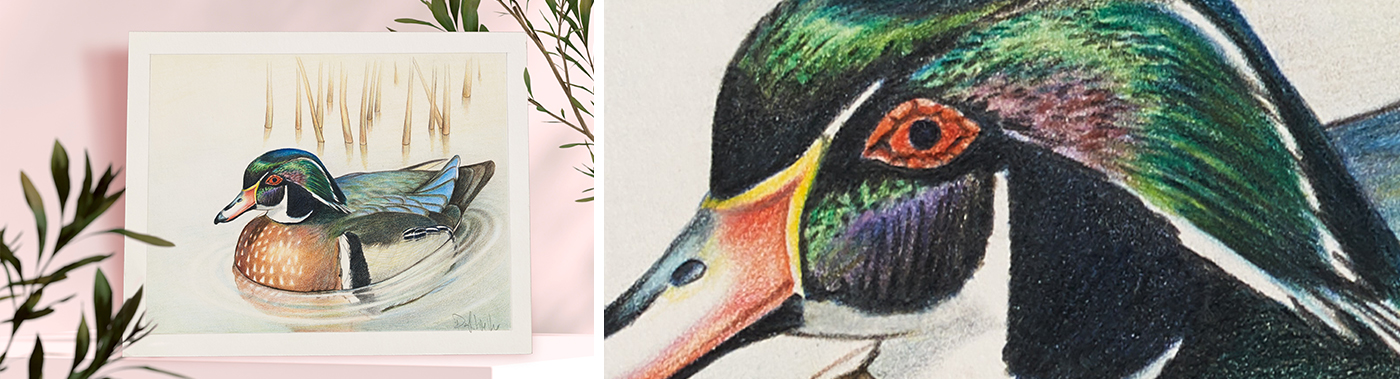
3
Use an 8” x 12” or larger piece of hot pressed, smooth, bristol board and mount to a flat and smooth drawing surface or board, using 3/4 “semi-sticky tape around the edges of the paper. When the tape is lifted at the end of drawing, a white 1/2” square border will appear.
4
With a #2 pencil, enlarge and gently draw the final thumbnail layout on the bristol board using very little pressure to not mar the surface of board.
5
Erase unnecessary pencil lines before using colored pencils. Use a paint brush to wipe away eraser remnants.
6
Place reference photos near the bristol board along with a set of watercolor pencils (Watercolor pencils do not contain wax, offer the ability to layer colors and shade while rendering without a build up of wax).
7
Begin to sketch back and forth gently within the pencil outline of the bird and other objects using lighter colored pencils as an underlay.
8
Continue to reference photo and identify light sources which create shadows on each object.
9
Add additional layers of color in areas where shadows appear in the photo. This will increase depth and create dimensional effects against the white background of the board.
10
Students eyes should be going back and forth frequently from the photo to the drawing to ensure accuracy.
11
Continue to work in the colors throughout each object to create a unified final image.