Close

Glazed Relief Tile
Lesson Plan, Grades 5-12, Art, Social Studies, Multi-Cultural, AMACO
Description
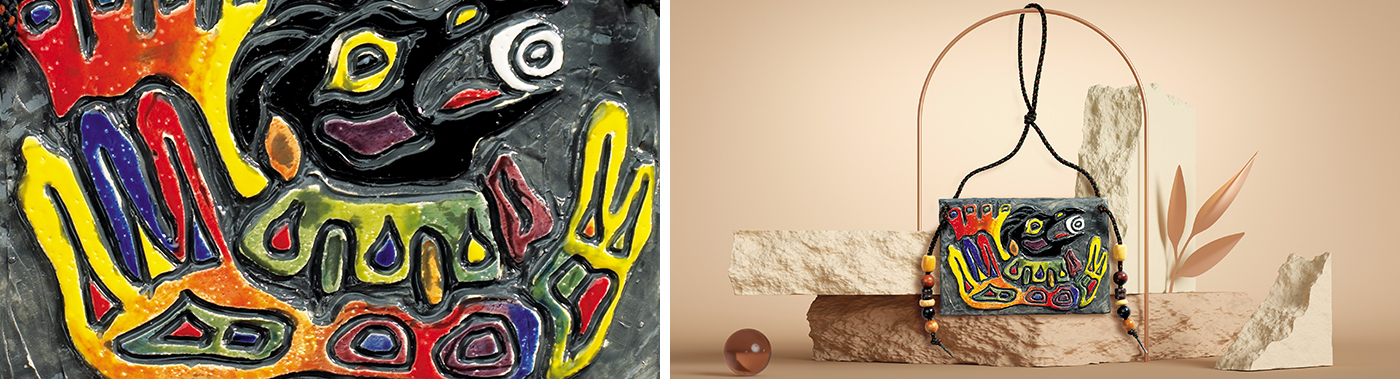
Tribes of the British Columbian Pacific Coast used materials found locally to decorate boxes, storage chests, totems and masks with beautiful low relief designs. In such a wet climate, fir and spruce are abundant materials for carving in both the Tlingit and Haida Tribes.These unique low-relief designs often depict local animals, birds and fish such as wolf, bear, beaver, whale, sea lion, eagle, raven and salmon. Most of the design motifs utilize the stylized depiction of faces and bodies using form lines: heavy abstract outlines using stretched-out os (ovoid), us, vs and various decorative lines to join the simple but expressive shapes. Traditional colors use a limited palette of black, red, green and blue.
Objectives
- Students will learn about the art work of the Pacific Coast Indians through the creation of a clay relief tile utilizing form, line and carved shape.
Supplies Needed
Amaco® Versa Clay 20 400258
Amaco® White Art 25 351452
Miniature Ribbon Steel Sculpting Tool 447794
Clay Slabmaking Complete Kit 409782
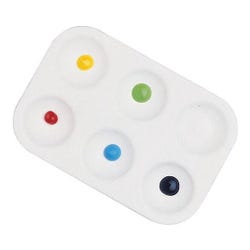
Amaco® Teacher's Palette™ Glaze Class Pack 2 (or) Amaco® Teacher's Choice™ Glazes 1367947
Colors of Glaze:
Red 1367905
Blue 1367902
Yellow 1367906
Black 1367900
White 1367901
School Smart® Short Colored Quill Feathers 085834
Suede Leather Lacing (or) 435335
Tipped Yarn Laces 247558
Natural Wood Bead Mix 085801
School Smart Plastic Paint-Rite Tray 085855
School Specialty Ceramic Brushes (7) Sax® Ceramic Masters Brushes 462116
Rigid Scraper 241590
Synthetic Ceramic Spon 408064
Fettling Knife - Soft Blade 385142
Standards
CONTENT Standard #1: Understanding and applying media, techniques and processes.
CONTENT Standard #3: Choosing and evaluating a range of subject matter, symbols and ideas.
CONTENT Standard #4: Understanding the visual arts in relation to history and cultures.
Instructions
1
Draw out a design using form lines on drawing or copy paper. Keep the close, but not overlapping, shapes big and simple.
2
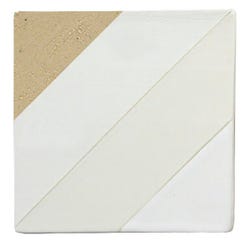
Using Amaco® white clay to enhance the colors of Amaco® Teachers Palette and Teachers Choice glazes, roll out on a canvas a clay slab 5" by 7 1/2" and 3 /8" thick. A ball of clay the size of a grapefruit or softball, weighing a bit over 2 lbs. is a good amount to use. A rolling pin and guide sticks help to roll the slab to an even 3 /8" thick.
3
Cut the tile to the rectangular shape with a fettling knife. To smooth the surface for carving, sponge the top surface, then scrape gently with a flat scraper or credit card. Be sure to pierce and rub away any air bubbles.
4
When your tile is approaching leather hard, place your drawing on the slab rectangle and, holding it carefully in place, trace over your design lines with a ball point pen or dull pencil to transfer your design to the tile.
5
Now is the time to plan what will be carved away and what clay will remain.
6
Using loop tools carefully dig out around the shapes. Dig down to an even ¼" depth.
7
Lines, details and textures may be added with a stylus stick, pin tool or craft stick. If work is to be continued, spritz the tile with a spray bottle and cover it with plastic.
8
Dont forget to create two neat hanging holes near the top of the tile.
9
When the clay is leather hard, tile may be colored in one of two ways: for a white background, (all the areas you carve away will be the color of your clay) just dry your tile (slowly to keep it from warping). Bisque fire it to cone 04, then glaze. For a dark background, a dark glaze may be painted with a wide brush over the whole carved tile.
10
Allow the glaze to dry, then scrape the surface glaze away with a metal scraper or credit card.
11
With a stiff bristle brush, remove any loose clay and glaze pieces from the grooves.
12
If you wish, the tile surface shapes may be burnished with a smooth stone or back of a spoon to enhance the design.
13
Remember to keep the tile from curling and warping, dry your tile slowly between sheets of newspaper and plywood or scrap sheetrock and newspaper.
14
When totally dry, bisque fire the tile to cone
15
If Amaco® Teachers Palette or Teachers Choice glazes are to be used, apply two coats of glaze to your raised surfaces and shapes.
16
Amaco® Teacher' Palette™ and Teachers Choice glazes can be intermixed to make new and unique colors to enhance the shape and textured designs. Try using just three primary colors and make your own secondary colors, or create a monochromatic color scheme by mixing varying amounts of black or white to any color. Another idea is to create a complimentary or an analogous color scheme.
17
Fired tiles can be strung through their hanging holes with jute, jewelry cord or raffia enhanced with beads, feathers and trinkets to provide a decorative flair.
18
If a three dimensional piece is desired, gently bend the still-damp carved tile over a soft drink can to create a curved form that can stand up as a sculpture or mask.