Close

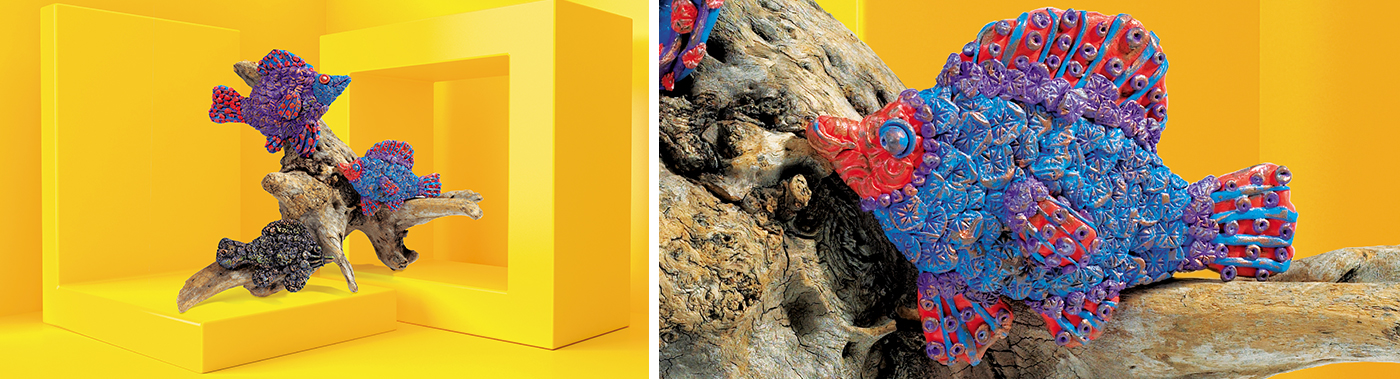
Fanciful Fish Relief Sculpture
Lesson Plan, Grades 6-12, Art, Social Studies, Science, AMACO
Description
Throughout history, people have studied and admired fish of all kinds for their beauty and mystery. Relief sculpture is a form of art in architecture which adorns buildings and structures all over the world and has its own place in the history of mankind. Combining the subject of fish and the relief sculpture technique, students will be able to depict and appreciate the beauty of nature in a different way.
Objectives
- Students will create a relief sculpture of a fanciful fish, honoring the many types of fish found in our seas and rivers.
- Cloud Clay will be the medium used to create the parts of an imagined fanciful fish imprinted with various texture designs from printing mats.
- Students will recognize the connections between art, science and history though this lesson in relief sculpture, which also includes texture and dimension
Supplies Needed
Amaco® Cloud Clay, 6 lb. Classroom Pack 1361983
Amaco® Rub n Buff® Sampler Set 1334824
Sax® Pattern Imprinting Mats 404865
Sax® Tempera Varnish Gloss 402270
Sax® 80 lb. Manila Drawing Paper Extra Heavy, 12"x18" 085581
Crayola® Arts and Crafts Brushes 1280532
Elmers® Glue All 405192
Crescent® Mat Board Assortment 405192
Pencils
Plastic Wrap
Plastic Bags
Standards
CONTENT Standard #1: Understanding and applying media, techniques and processes.
CONTENT Standard #3: Choosing and evaluating a range of subject matter, symbols and ideas.
CONTENT Standard #4: Understanding the visual arts in relation to history and cultures.
Instructions
Teacher preparation:
Collect photos, prints and note internet sites of examples of relief sculpture. Good examples are our own government buildings and monuments that have excellent examples of the Relief/Bas-Relief Sculpture techniques.
1
Tell students they will combine the study of fish from science, using research from art history on relief sculpture, along with art techniques to create an imaginary fish relief sculpture.
2
Discuss and show examples of relief sculpture from history and present day. Explain that objects or subjects of a relief sculpture project from a base or background. They are always attached to the base and project outward. The entire picture is called a Relief or Frieze and the subjects are referred to as the Bas-Relief part of the sculpture.
3
Have students research their own examples for relief sculpture from the internet and books and share examples from their own neighborhoods.
4
Discuss how fish have been a subject of artists throughout history. Do a simple fish print to give students a better idea of the shape and feel of a fish.
5
Explain to the students that they will use their imaginations to create a fish in relief form from Cloud Clay. Have students study the parts of a fishs body and do an outline sketch of an imaginary fanciful fish on manila paper. This will serve as a guide for the project done in Cloud Clay.
6
Cloud Clay lends itself to imprinting very nicely. Experiment with the imprinting mats and Cloud Clay to find interesting surface designs for the imaginary fish.
7
Using their fish outline drawing only as a guide, instruct the students to make a flat fish shape from Cloud Clay to serve as a base for their relief sculpture.
8
Instruct students to create all parts of their imaginary fish: head, tail, body, fins, eyes, scales, gills and mouth from Cloud Clay imprinting each part BEFORE adding them to the base shape one by one.
9
Join the parts of the fish by simply sticking them together. The Cloud Clay sticks to itself without glue. If you need to complete the project another day, cover the fish with plastic wrap and store it in a tightly sealed plastic bag. Parts may be added with Elmers® glue at a later date.
10
Remind students that a relief sculpture can not only be just a side view of a subject, but may have many parts that are almost in the round.
11
Give the fish some character and dimension by twisting a fin or tail.
12
Varnish the fish with Sax® Tempera Varnish to add strength to the piece.
13
When the fish are dry, instruct the student how to apply the various colors of Rub nBuff® to complete their fish. You can apply it with your fingers or dry brush it on the surface of the fish using a very light touch. Dry brushing provides a wonderful effect and brings out the imprinted designs made from the imprinting mats.
14
Mount the fish on mat board using Elmers® Glue All.
15
Have students evaluate their own Relief Sculpture, as well as that of classmates.
16
Remind students that their Relief Sculpture was the result of studying Art History, Science and Art.