Close

Drawing the Light
Lesson Plan, Grades 8-12, Math, Sax, Drawing
Description
Lesson Plan and Artwork by Meredith Ose
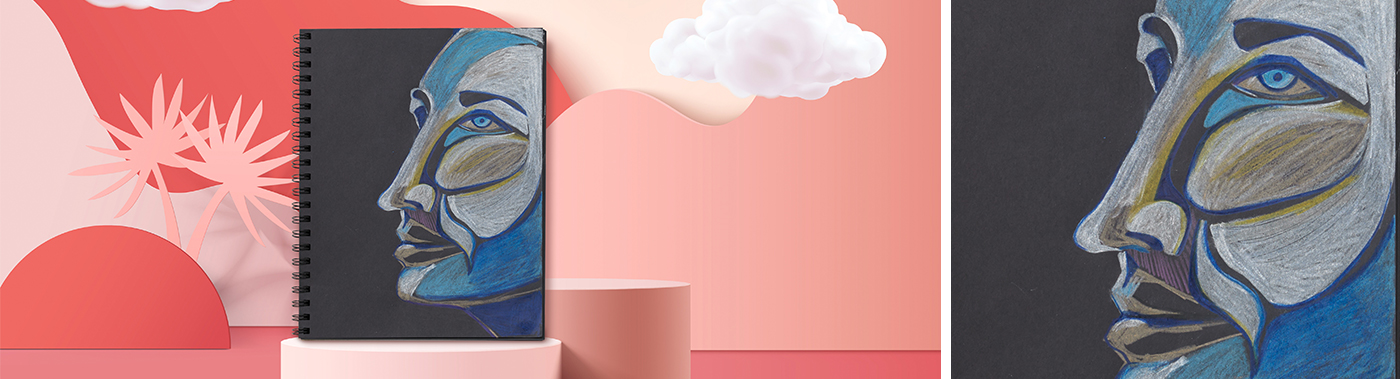
This drawing lesson teaches students to focus on individual parts of a subject. Students will build their drawing like a puzzle, using parts of light that they see within or on a subject or a group of subjects, such as a still life.
Objectives
- Students will improve drawing skills.
- Students will focus on parts of a whole to build a whole image - a pathway to creating drawn images.
- Students will use their knowledge of shapes to use as building blocks of basic drawing.
Supplies Needed
Sax® Black Sketchbook 8 1/2" x 11", 50 sheets 1465887
Sax® Colored Pencils, Set of 36 1438800
Hand-Held Pencil Sharpeners, Box of 25 1439410
Sax® Soap Erasers, Box of 24 247703
Sax® Fotolite® Aluminum Studio Light 463118
*Here are the supplies needed for this lesson plan for reference. Find a convenient carousel of shoppable products for this lesson below.
Standards
CONTENT Standard #1: Generate and conceptualize artistic ideas and work.
CONTENT Standard #2: Organize and develop artistic ideas and work.
CONTENT Standard #10: Synthesize and relate knowledge and personal experiences to make art.
Instructions
1
Create a subject matter with a strong contrasting light source. Make a still life in the middle of the room, or, to do portraits, take turns setting students in the middle of the room.
2
Topics for group discussion and teacher demonstration with the group: See where the light hits the subject? Find the areas of light and state what shape or combination of shapes the light is creating for each separate area of light. Focus on one area at a time but follow with a connected area so that in the end you have a whole image formed out of the individual shapes.
3
After you and the group agree on the shape, draw it on a large sheet of paper. Continue doing this with the group as a demonstration on how to look at the light and draw only what is seen, not what is known. Example: If you are looking at a face, the student model will be sitting in the middle of the room so that each of the other students will be looking at it from a slightly different view point. Demonstrate: Tell students, We know this person has two eyes but can you see both eyes from your view point? Only draw what you see from your view point and focus on the shapes that you see forming the eye, mouth, or cheek areas. Don't think, 'I am drawing my friend's face' or 'I am drawing a whole face' or even 'I am drawing an eye'. Just keep your attention on one shape at a time, connecting the shapes together until all are represented. Then step back and assess what you have drawn.
4
Now have the students try to draw the subject on their own in their black sketchbooks, using a light colored pencil to represent the light. This could be a white pencil, any of the yellow shades, or the light shades of another color (e.g., light blue or light pink).
5
As they continue to build with shapes of light, students will start to notice the definition of the whole subject. Defined parts of the portrait like chin, mouth, lips, nostrils, brows, eye lids, and ears will come together to complete the whole image. Students may choose bolder colors to help define these areas as they come together. Encourage students to continue to look back and forth from their drawings to the subject and keep seeing the subject as shapes, breaking up each area into parts as if they are putting a puzzle together.