Close

Sidewalk Chalk Zentangle
Lesson Plan, Grades K-8, Art, Science, Math, Social Studies, Sax
Description
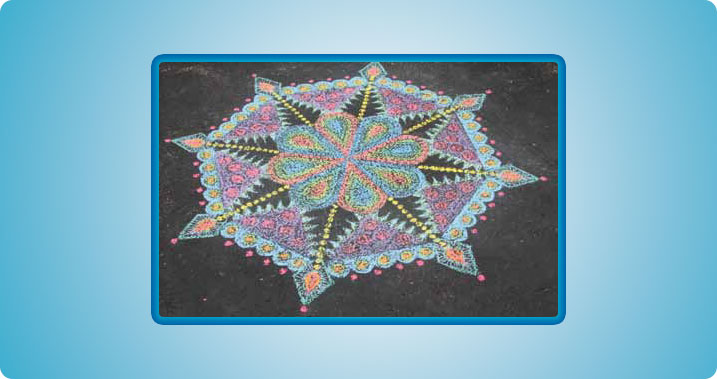
The science behind 3-D color theory allows various colors of chalk to appear on different planes, floating above, below or on the surface of the black-top when 3-D glasses are used. The eyes can then perceive color wavelengths as the glasses decode this optical illusion. The Mandala is circular, traditionally sacred art, which historically appeared in numerous cultures. Here, it is influenced by Zentangle® art and enhanced by the rough texture of the dark playground surface breaking through the chalk design.
Safety Tips:
The glasses may tire eyes if worn for extended periods. Students may use the glasses for brief periods, on and off, as an aid during the drawing process of viewing.
Variation:
This artwork could also be used with a small group by assigning 8 students one section of the design, or incorporate the entire class as the circle grows.
For Special Artists Or The Very Young: For those that can grasp the chalk, but cannot draw patterns, pre-made stencils could be used with assistance or consider allowing students to create their own patches of color, independently, as their ability allows. As long as they use warm and cool colors their artwork will respond to the glasses, however, a student must have binocular vision (both eyes) to use 3-D glasses successfully.
Objectives
- Students will learn basic 3-D color theory, as it applies to optical illusions, created when 3-D glasses are used.
- Students will use geometric shapes, repetition and radial patterns to create a Zentangle®/Mandala influenced design, done in large scale.
Supplies Needed
Crayola® Washable Sidewalk Chalk Large, 52 Count
Crayola® Washable Sidewalk Crayons Large, 15 Count
Sax® 3-D Glasses Pack of 10
Roselle Gray Chipboard 19" x 26", 10 Ply, Pack of 10Optional Materials
Sax® Color Power Holographic 3-D Color Theory Unit
C Thru® Combo Drawing Set
Alvin® Full Circles Template
- A variety of container lids of different shapes and sizes or any items that can be traced repeatedly
- Rulers and yardsticks
- <em>Design Originals Zentangle® Basics</em> by Suzanne McNeil, CZT
- <em>Design Originals Zentangle® 2</em> by Suzanne McNeil, CZT
- <em>Design Originals Zentangle® 3</em> by Suzanne McNeil, CZT
- <em>Design Originals Zentangle® 4</em> by Suzanne McNeil, CZT
Standards
CONTENT Standard #1:
Understanding and applying media, techniques and processes.
CONTENT Standard #4:
Understanding the visual arts in relation to history and cultures.
CONTENT Standard #3:
Choosing and evaluation a range of subject matter, symbols and ideas.
CONTENT Standard #6:
Making connections between visual art and other disciplines.
Instructions
1
Preparation: Before starting the drawing, decide whether this will be done as a freehand or if pre-made templates, rulers and yardsticks will be used. Chipboard may be used to draw and cut out various sizes of geometric shapes. Gather container lids or any other objects that can be traced.
2
Before beginning, teach your students some basic 3-D color theory, using examples of chalk on black paper or on the playground. The colors will respond in this order, nearest to farthest: Red, Orange, Yellow, Green, Violet, Blue. Generally, you will see that the warm colors float above the surface and the cool colors appear below. The illusion of "steps" can be created by using the colors, in order, next to one another. Warm shapes surrounded by cool backgrounds will float. Cool shapes surrounded by warm colors will appear as tunnels or holes. Try viewing the photo of this lesson plan with 3-D glasses, which should give you some kind of an idea of what to expect. For those of you that would like to pursue 3-D color theory in much greater detail, you may wish to get the Sax 3-D Color Theory Teaching Unit, listed below.
3
Start your artwork by lightly drawing two perpendicular lines forming an "X", using a yardstick or freehand, if desired. For greater precision with older students, a protractor may be used.
4
Draw two more lines crisscrossing the "X" to make 8 equal "pie slices".
5
Starting from the center, draw or use templates to make the same shape, 8 times, one in each section, to begin your radial design.
6
Continue with another sequence of 8 images around the circle, deciding what areas you want to recede and what should pop forward.
7
Dots can be created with the flat end of the chalk, pressed firmly on the surface and twisted.
8
The artwork is finished when it reaches the desired size.
9
Enjoy viewing it with the 3-D glasses!
10
Make sure you take photos of the artwork, before rain dissolves it. Even printed copies or photos on a computer screen will respond to the glasses! Experiment with different distances for the best viewing.